

The Role of the Mole in Combat
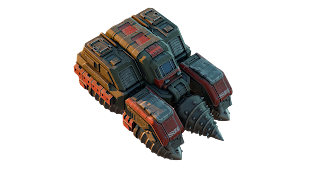
The Mole is more than just a combat vehicle; it’s a versatile engineering marvel equipped to handle a variety of battlefield scenarios. Its most distinctive feature is the massive drill that dominates its front. This drill isn't just for show—it serves as a powerful weapon against medium and heavy armored vehicles, allowing the Mole to engage and neutralize formidable enemies.
But the Mole’s true strength lies in its ability to support and sustain your forces in the heat of battle. Equipped with an auger chassis, the Mole can quickly dig in and transform into a mobile workshop. This transformation allows the Mole to repair allied land vehicles even under enemy fire, making it an invaluable asset in prolonged engagements where maintaining your frontline strength is critical.
Tactical Versatility: From Combat to Repair
The Mole’s versatility doesn’t end with its drill and repair capabilities. In emergency situations, the Mole can completely go underground, avoiding enemy detection and emerging later to provide critical support where it’s needed most. This ability to disappear and reappear makes the Mole a strategic tool for commanders who value flexibility and surprise tactics.
Additionally, the Mole can deploy turrets that automatically target and attack both land and low-flying enemies. These turrets extend the Mole’s defensive reach, allowing it to hold strategic points effectively while continuing to support your ground units.
Special Feature: Mobile Workshop
One of the Mole’s standout features is its ability to automatically deploy a mobile workshop when it stops moving. This workshop not only repairs allied land vehicles but does so even under the stress of enemy fire. This feature can be a game-changer, allowing you to keep your forces in fighting condition during critical moments in a battle.
Imagine a scenario where your frontline tanks are taking heavy damage. Instead of retreating or waiting for reinforcements, you can deploy the Mole to the front, where it will dig in, repair your vehicles, and keep your offensive momentum going. This ability to sustain your forces in real-time makes the Mole an essential unit for any commander focused on long-term battlefield dominance.

Availability and Strategic Importance
The Mole becomes available in PvP from rank 9, making it a late-game unit that can provide a significant advantage as battles grow more complex. Until then, it can be utilized in campaign missions, giving players a chance to master its unique abilities and develop strategies for its use in multiplayer scenarios.
When deploying the Mole, consider its dual role as both a combat vehicle and a support unit. Use its drill to take out high-value targets, then shift into workshop mode to repair and sustain your forces. The Mole’s ability to deploy turrets also makes it a strong choice for defending key positions on the map, especially when facing waves of enemy units.
Conclusion: The Mole’s Impact on Warfare
In Art of War 3, the Mole represents the perfect blend of offense and support, providing commanders with a tool that can adapt to the ever-changing conditions of war. Its ability to dig in, repair, and defend makes it a linchpin in any strategy focused on sustained combat effectiveness.
As you climb the ranks and unlock the Mole for PvP, remember that its strength lies in its versatility. Whether you’re holding a strategic point, supporting your frontline units, or launching an assault on enemy positions, the Mole will be there to drill through the opposition and keep your forces in the fight.
